
Setup
To connect a new workspace to Medtech OS, follow the step-by-step instructions on the Setup page.
Integration permissions for new databases. The Notion integration only has access to databases and pages that have been shared with it via the Connections option in the page menu. If you add a new database to your workspace, you may need to manually add it to the Medtech OS connection before it can be accessed.
First-time login and signing password
Medtech OS does not use a reusable login password. Instead, it emails a new six-digit, single-use login code whenever you sign in. Your signing password is a separate credential used only when electronically signing a document.
Workspace access is required for ordinary users: a workspace owner must add you, or a signature request must activate you in its workspace, before Medtech OS sends a login code. Administrators and superusers can sign in without a workspace association.
First-time login walkthrough
- Open the Medtech OS login page, enter the email address associated with your Medtech OS account, and select Send Login Code.
- Open the email from Medtech OS and enter its six-digit code on the Enter Login Code page. If the code is invalid or expired, request a new one.
- After login, workspace owners and administrators are taken to the workspace list, while signers are taken to their signing dashboard. If login began from a Signing Link, Medtech OS returns you to that signing workflow.
Setting up your signing password
The first time you open a Signing Link without a signing password, Medtech OS displays Complete Registration. Confirm your full name, choose and confirm a signing password, and select Set Password & Continue to return to the document. You will enter this same signing password each time you sign; Medtech OS login continues to use emailed one-time codes.
Login code versus signing password. The emailed login code authenticates your Medtech OS session and is used once. The signing password confirms your identity during each electronic-signature event and must not be shared.
Medtech OS web app
Most document authoring and workflow actions happen in Notion. The Medtech OS web app is the companion interface for document-control tasks such as reviewing exported records, managing workspace users, and investigating background jobs.
Workspace list
After signing in, workspace owners see the workspaces they own and Medtech OS administrators see all workspaces. Select a workspace name to review its registered document databases, documents, revisions, and available artifacts.
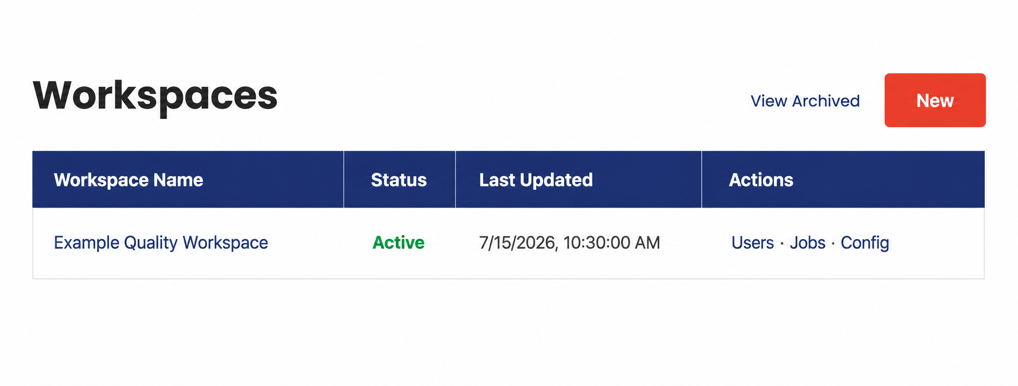
| Column | Meaning |
|---|---|
| Workspace Name | The name of the connected Notion workspace. Select it to view the document and revision hierarchy stored by Medtech OS. |
| Status | Whether the Notion integration record is active. This is not a real-time connection health check. |
| Last Updated | When the integration was created or its connection settings or credentials were last saved. This does not show the most recent document edit, export, or signing activity. |
| Actions | Links to the workspace’s Users, Jobs, and Config pages, subject to the access described below. |
Revision statuses
The Status property on a Notion revision shows its current document-control state:
| Status | Meaning |
|---|---|
| Processing | An export or refresh is in progress. |
| Draft | The export completed and the revision can be reviewed or sent for signatures. |
| Error | The export or refresh failed. The Medtech OS property on the revision provides more detail. |
| In Approval | The revision is awaiting approval. It normally has outstanding signature requests; after Restore, run Request Signatures to send replacement links for canceled requests. |
| Approved | All requested signatures are complete and the Signed PDF is available. |
| Superseded | A newer revision has been approved. The revision remains in the active controlled history. |
Workspace actions
| Link | Who can use it | Purpose |
|---|---|---|
| Users | Workspace owners and administrators | View and manage the Medtech OS accounts associated with the workspace, including roles, account status, and signing-password resets. |
| Jobs | Workspace owners and administrators | View passive history for background tasks such as exports, configuration updates, and signature processing. Each job has a stable job ID for support and troubleshooting; Jobs does not run workflow actions. |
| Config | Medtech OS administrators only | Update the workspace name, workspace owner email, Export Config database, or Notion access token. Workspace owners cannot open this page. |
People in Notion and users in Medtech OS
The People database is a Notion database used to select document approvers and provide their names and email addresses to workflows. Users are accounts stored by Medtech OS for login, workspace access, signing-password management, and account status. A People record is not itself a Medtech OS login account.
Users and permissions
Medtech OS has two workspace roles. It does not provide department-based permissions, groups, or custom roles at this time.
| Role | Description |
|---|---|
| Signer | Can view and sign documents that have been sent to them for signature. This is the default role when a user is added to a workspace. |
| Workspace Owner | Has the same workspace-scoped permissions as a Medtech OS administrator, except for administrator-only configuration. Workspace owners can manage users, view databases and jobs, and trigger refresh, export, and re-run operations within their workspace. They cannot see or act on workspaces they do not own. |
Workspace roles control account access; they do not assign approval responsibility. Approvers are selected for each document in the Notion Approvers property and are copied to each new revision. A Signer can approve only a revision that has been sent to them for signature.
A single person can have different roles in different workspaces. For example, someone could be a workspace owner in one workspace and a signer in another.
How users are added
Users are added to a workspace in two ways:
- Automatically via signing. When someone is added as an approver on a document in Notion and a signature request is sent, Medtech OS creates their account and workspace access before sending the email. The first time they click a Signing Link, they only need to set up their signing password. A request for someone who was deactivated in that workspace is rejected until a workspace owner or administrator reactivates them.
- Manually by a workspace owner. Workspace owners can preemptively add users from the Workspace Users page. This is useful for setting up accounts before signature requests are sent or for adding workspace owners who need management access. The added user receives a welcome email identifying the workspace and linking to these reference docs; they can then log in at any time from the login page.
Account lockout. If a signer enters the wrong signing password five times in a row, their account is locked. A workspace owner can unlock it from the Workspace Users page.
Delete and obsolescence
Medtech OS uses delete for records that do not contain approved revisions and Mark Obsolete for approved document databases, documents, and individual approved revisions.
- Delete is irreversible. The corresponding Notion document and revision pages are moved to trash, and outstanding signature requests for deleted items are canceled.
- Mark Obsolete is a signed action that requires a reason and signing password. It preserves controlled records in the Medtech OS Obsolete view, cancels outstanding signature requests, and attempts to archive the corresponding Notion pages when Notion supports that operation.
- Restore is also a signed action. It reverses one obsolescence batch while preserving revisions that were marked obsolete separately; an individual revision can be restored only while its document has another active revision. Restore does not reactivate canceled Signing Links or send email, so run Request Signatures for a restored In Approval revision to send replacement links to approvers who still need to sign.
When a new revision is approved, the prior approved revision becomes Superseded. Superseded revisions remain in the active document history and do not appear in the Obsolete view unless they are marked obsolete separately.
Export Config
The Export Config database is the central configuration for Medtech OS. Medtech OS reads this database to determine which document databases can export documents. Each row links to a document database and specifies the DOCX template and settings used when documents in that database are exported. Most users will not need to modify this database often, other than to update the DOCX template.
| Property | Type | Purpose |
|---|---|---|
| Database | Title | Contains an @-mention to a Notion document database. This title property is how Medtech OS links the export config row to the database whose documents use this template. |
| Template | Files | A DOCX template file. See DOCX Template for details on what you can change. |
| Export Properties | Checkbox | Optional. When checked, exported documents include a two-column property table at the top showing the document’s Notion properties. See Property Table for details. |
| Medtech OS | Rich text | The Update Configuration and Export All buttons write status and results here. |
Run Update Configuration after all changes. After changing any database schema, uploading a new template, or toggling Export Config settings (like Export Properties), run Update Configuration from your Export Config page. It validates the linked databases, caches templates, and persists configuration changes.
Nesting Export Config databases. If an Export Config row’s Database property @-mentions a database titled exactly “Export Config”, Medtech OS treats it as a nested Export Config and recursively processes all rows in that database. This works for Update Configuration, Export All, and workspace setup. Nesting can be multiple levels deep.
Document, Revision, and People Databases
Each Export Config row points to a Document database. The Document database, in turn, is linked via relation properties to a Revisions database and a People database. A workspace can have many Document databases—for example, separate ones for design controls, SOPs, and regulatory submissions—each with its own Export Config row and template. Frequently, the same Revisions and People databases are shared across Document databases.
You’re free to rename these databases, add your own properties and views, and organize pages however you like—as long as the required properties listed below are present with the correct types.
Documents
Each page in this database represents a document that can be exported. Notion automations on this database trigger Medtech OS exports.
| Property | Type | Purpose |
|---|---|---|
| Title | Title | The document name. Should contain the document ID followed by the document name (e.g. “DOC-004 Software Requirements Specification”). See Document IDs for how this is parsed. |
| Revisions | Relation | Links to the Revisions database. Each export creates a new revision page here. |
| Approvers | Relation | Links to the People database. Approvers are copied to each new revision. |
| Medtech OS | Rich text | Medtech OS writes status updates, progress, and error messages here. |
Revisions
Each page in this database represents one exported revision of a document. Medtech OS creates these pages automatically during export and attaches the generated files.
| Property | Type | Purpose |
|---|---|---|
| Title | Title | The revision name (e.g. “ABC 123”). Set automatically by Medtech OS during export. |
| (document back-relation) | Relation | Links back to the originating document page. This property is created automatically by Notion when you add a two-way “Revisions” relation on the Document database. Its name is determined by Notion and may differ for each Document database that shares this Revisions database. |
| Status | Select | Tracks the revision lifecycle. Must include the options listed below. |
| Processing | Export is in progress. | |
| Draft | Export completed successfully. | |
| Error | Export failed. See the Medtech OS property for details. | |
| In Approval | Revision is awaiting approval. | |
| Approved | Revision has been approved. | |
| Superseded | A newer revision has been approved; this revision remains in controlled history. | |
| Approvers | Relation | Links to the People database. Must target the same database as the Document’s Approvers. |
| Medtech OS | Rich text | Export progress and error messages. |
| DOCX | Files | The generated Word document is uploaded here. |
| Files | The generated PDF is uploaded here. After all approvers have signed, the Signed PDF (which includes the signature page) replaces the original PDF in this property. | |
| Redline | Files | Optional. A tracked-changes comparison against the previous revision, if one exists. If this property is absent, redline generation is skipped. |
People
A team directory. The Approvers relation on both the Documents and Revisions databases must point to this same People database.
| Property | Type | Purpose |
|---|---|---|
| Title | Title | The person’s name. |
| Contact email. Used for notifications when Medtech OS cannot reach the user via Notion. |
Export Config
Stores export templates and configuration. Each row links to a document database and determines the template used when documents in that database are exported.
| Property | Type | Purpose |
|---|---|---|
| Title | Title | A name for this configuration. Not used internally—choose whatever is meaningful to you. |
| Database | Rich text | Contains an @-mention to a Notion document database. This links the export config to the database whose documents use this template. |
| Template | Files | A DOCX template file. See DOCX Template for details on what you can change. |
| Export Properties | Checkbox | Optional. When checked, exported documents include a two-column property table at the top showing the document’s Notion properties. See Property Table for details. |
| Medtech OS | Rich text | The Update Configuration and Export All buttons write status and results here. |
Property names are case-sensitive. “DOCX” is not the same as “Docx” or “docx”. Make sure property names match exactly.
Relation targets matter. The Approvers property on the Documents and Revisions databases must both point to the same People database. If they point to different databases, Update Configuration will report an error.
Document IDs
Medtech OS extracts the document ID from the document title (the Title property in the Documents database). The title is expected to start with an ID in the format ABC-123—one or more uppercase letters, a hyphen, and one or more digits, followed by a space.
For example, given the title “DOC-004 Software Requirements Specification”, the ID is “DOC-004” and the name is “Software Requirements Specification”.
If the title does not match this pattern, the name is the full title and the ID will be empty.
Notion workflow actions
Users primarily interact with Medtech OS through buttons on Notion pages. Each button triggers an automation that calls the Medtech OS API.
New Revision
Triggered from a Documents page. Creates a new Revision page with Approvers copied from the Document, auto-assigns the next revision name (A, B, C… or 1, 2, 3… based on existing revisions), and queues an export job.
The export job generates three files:
- DOCX — the formatted document, built from the current Notion page content and the linked template.
- PDF — converted from the DOCX.
- Redline (optional) — a tracked-changes comparison against the previous revision’s DOCX, if one exists. Only generated when the Revisions database includes a “Redline” files property.
One unfinished active revision at a time. Approve or delete the unfinished active revision before creating a new one. Superseded and obsolete revisions remain historical and do not block creation.
Refresh Revision
Triggered from a Revisions page. Re-exports the DOCX using the current source content without creating a new Revision page. Produces updated DOCX and PDF files (and Redline, if the property exists), replacing the previous versions.
Refresh is blocked for controlled workflow history. Medtech OS does not allow refresh for revisions in “In Review”, “In Approval”, “Approved”, or “Superseded” status. This protects review activity and approved history.
Sign Revision
Triggered from a Revisions page. Sends a Part 11 compliant signing request to the email specified on the revision. The revision status changes to “In Approval” and the Medtech OS property shows which signers have not yet signed.
Revision must be in Draft status. Signatures can only be requested for revisions that have been exported and are in the “Draft” state. If you need to make changes, delete the revision and re-export before requesting signatures.
Deleting a revision in “In Approval” cancels signatures first. If you delete a revision that is currently being signed, the first delete cancels all outstanding signing requests and resets the revision to “Draft”. You must delete a second time to fully remove the revision.
Delete Revision
Triggered from a Revisions page. Cancels any active jobs for the revision and deletes the Revision page from Notion.
Update Configuration
Triggered from the Export Config page. Validates that the linked document database and its related databases have the required properties and that the attached DOCX template is valid. Also registers or updates the document database record. If the row references a nested Export Config database, validation runs recursively for all nested rows.
Run after any schema or template change. Always re-run Update Configuration after modifying database properties, uploading a new DOCX template, or adding a new document database.
Export All
Triggered from an Export Config row. Exports every document in the linked database, bundles them into a ZIP archive, and emails a download link to the requesting user.
Admin only. Only Medtech OS admins (Innolitics employees) have access to the Export All function.
Signing
Medtech OS implements electronic signatures that comply with 21 CFR Part 11. Each signature requires two identification components: the signer’s full name and their signing password.
Signing walkthrough
- Open the unique Signing Link in the signature-request email. If necessary, log in using the one-time code sent to the same email address. Signing Links and document downloads open only for the intended signer’s account.
- If this is your first signing request, confirm your name and create your signing password on the Complete Registration page.
- Review the document in the embedded PDF viewer. The Signing Page also provides document downloads, links to PDF attachments, and the status of the other signers.
- Enter your signing password and select Sign Document. Medtech OS records the meaning assigned when the signature request was created, and the final Signed PDF includes it on the Certificate of Completion.
- After all requested approvals are complete, Medtech OS sets the revision status to Approved and generates the Signed PDF.
Finding the Signed PDF and signature certificate
Open the revision in Notion and use its PDF property. After approval, the Signed PDF replaces the unsigned PDF in that property. Workspace owners can also download it from the corresponding revision in the Medtech OS workspace hierarchy.
The final page of the Signed PDF is a Certificate of Completion. It identifies the document and revision, displays the SHA-256 hash that links the certificate to that document, and lists each signer’s printed name, signature meaning, and signing time in UTC.
Audit Trail
Workspace owners can open Audit Trail from the workspace document hierarchy. Each document row also has an Audit Trail link that shows only events for that document. The scoped view identifies the document by title and provides a Clear document filter link. The trail records successful New Revision, Regenerate, Request Signatures, Signature, permitted Delete, Obsolete, Restore, and automatic Supersede actions. Historical Archive and Unarchive events remain available for filtering and export. Obsolete and Restore details include the signed reason and affected revision identifiers; Supersede details identify both revisions and the final approver who caused the transition.
The page verifies the workspace’s tamper-evident event chain and keeps evidence visible if verification reports a problem. Use the date and action filters to narrow the view, then export the filtered results as CSV. Date filters use your local timezone automatically.
The audit trail is forward-only. Medtech OS does not reconstruct activity from before the audit trail was deployed. Audit Trail views and exports do not create additional controlled-record events.
Export Behavior
Medtech OS exports Notion pages to DOCX and PDF, but the exported output is not a one-to-one copy of what you see in Notion. Several block types are transformed, removed, or expanded during export to produce clean, professional documents. Understanding these behaviors will help you structure your Notion pages so the exported output looks the way you expect.
Callout Blocks
Callout blocks are stripped from the exported document entirely.
Use callouts for internal notes. Callouts are ideal for content you want to keep in your working copy but exclude from the official output—for example, internal notes, references to where diagrams were created, draft commentary, or context that is useful for authors but should not appear in the final document.
Toggle Blocks
Regular toggle blocks are exported as a paragraph containing the toggle heading text. The child content inside the toggle is also included. Toggle headings (H1, H2, H3 toggles) are exported as the corresponding heading level with their children included normally.
Blue Toggle Blocks
If a toggle block has a blue background, Medtech OS strips the toggle wrapper during export and pulls its content up into the surrounding document. The toggle heading is removed, but everything inside the toggle is kept.
This is useful when you want to hide content from the normal Notion page view while still including it in the exported document. Jinja blocks are commonly placed inside blue toggle blocks so that the template code stays collapsed and out of the way during everyday editing.
Link to Page
A Link to Page block is replaced during export with the full content of the linked page. This lets you maintain a single source of truth for shared content and include it in multiple documents automatically. For example, you might keep a single Indications for Use statement as its own Notion page and link to it from every document that needs it.
To create a Link to Page block, type /link in Notion and select “Link to page.”
Not the same as a mention. A Link to Page block is different from a mention (typing @Page Name inline). A mention normally renders as a simple hyperlink in the exported document. A Link to Page block inlines the entire page’s content.
Exception for Content pages: If a mention appears alone on its own line and the mentioned page’s title ends with “Content” (e.g., “SOP Template Content”), Medtech OS treats it as a Link to Page and expands the content inline. This is a convenience for users who are accustomed to using mentions instead of Link to Page blocks.
Divider Blocks
Notion divider blocks are converted to page breaks in the exported document. Use dividers to control where page breaks appear in your output.
Image Blocks
Images are automatically resized during export so they fit the page layout in Word. Medtech OS scales oversized images down to fit within the current page text area, preserves aspect ratio, and does not upscale smaller images. Image sizing also respects list indentation, so images inside nested lists are constrained to the narrower available width for that nesting level.
Mermaid Diagrams
Mermaid code blocks are exported as vector diagrams in DOCX and PDF documents, so their text and lines remain sharp when viewed or printed at larger sizes.
File Blocks
Notion file blocks are exported as PDF attachments. The file is embedded in the generated PDF and appears as a labeled attachment that can be opened in Adobe Acrobat and other full-featured PDF readers. In the DOCX and PDF body, the file appears as plain text with an “(attachment)” label.
Jinja Blocks
Jinja blocks are how Medtech OS pulls structured content from Notion databases—such as requirements, user needs, risks, and verification activities—and inserts it into traceability tables and other formatted sections within your documents.
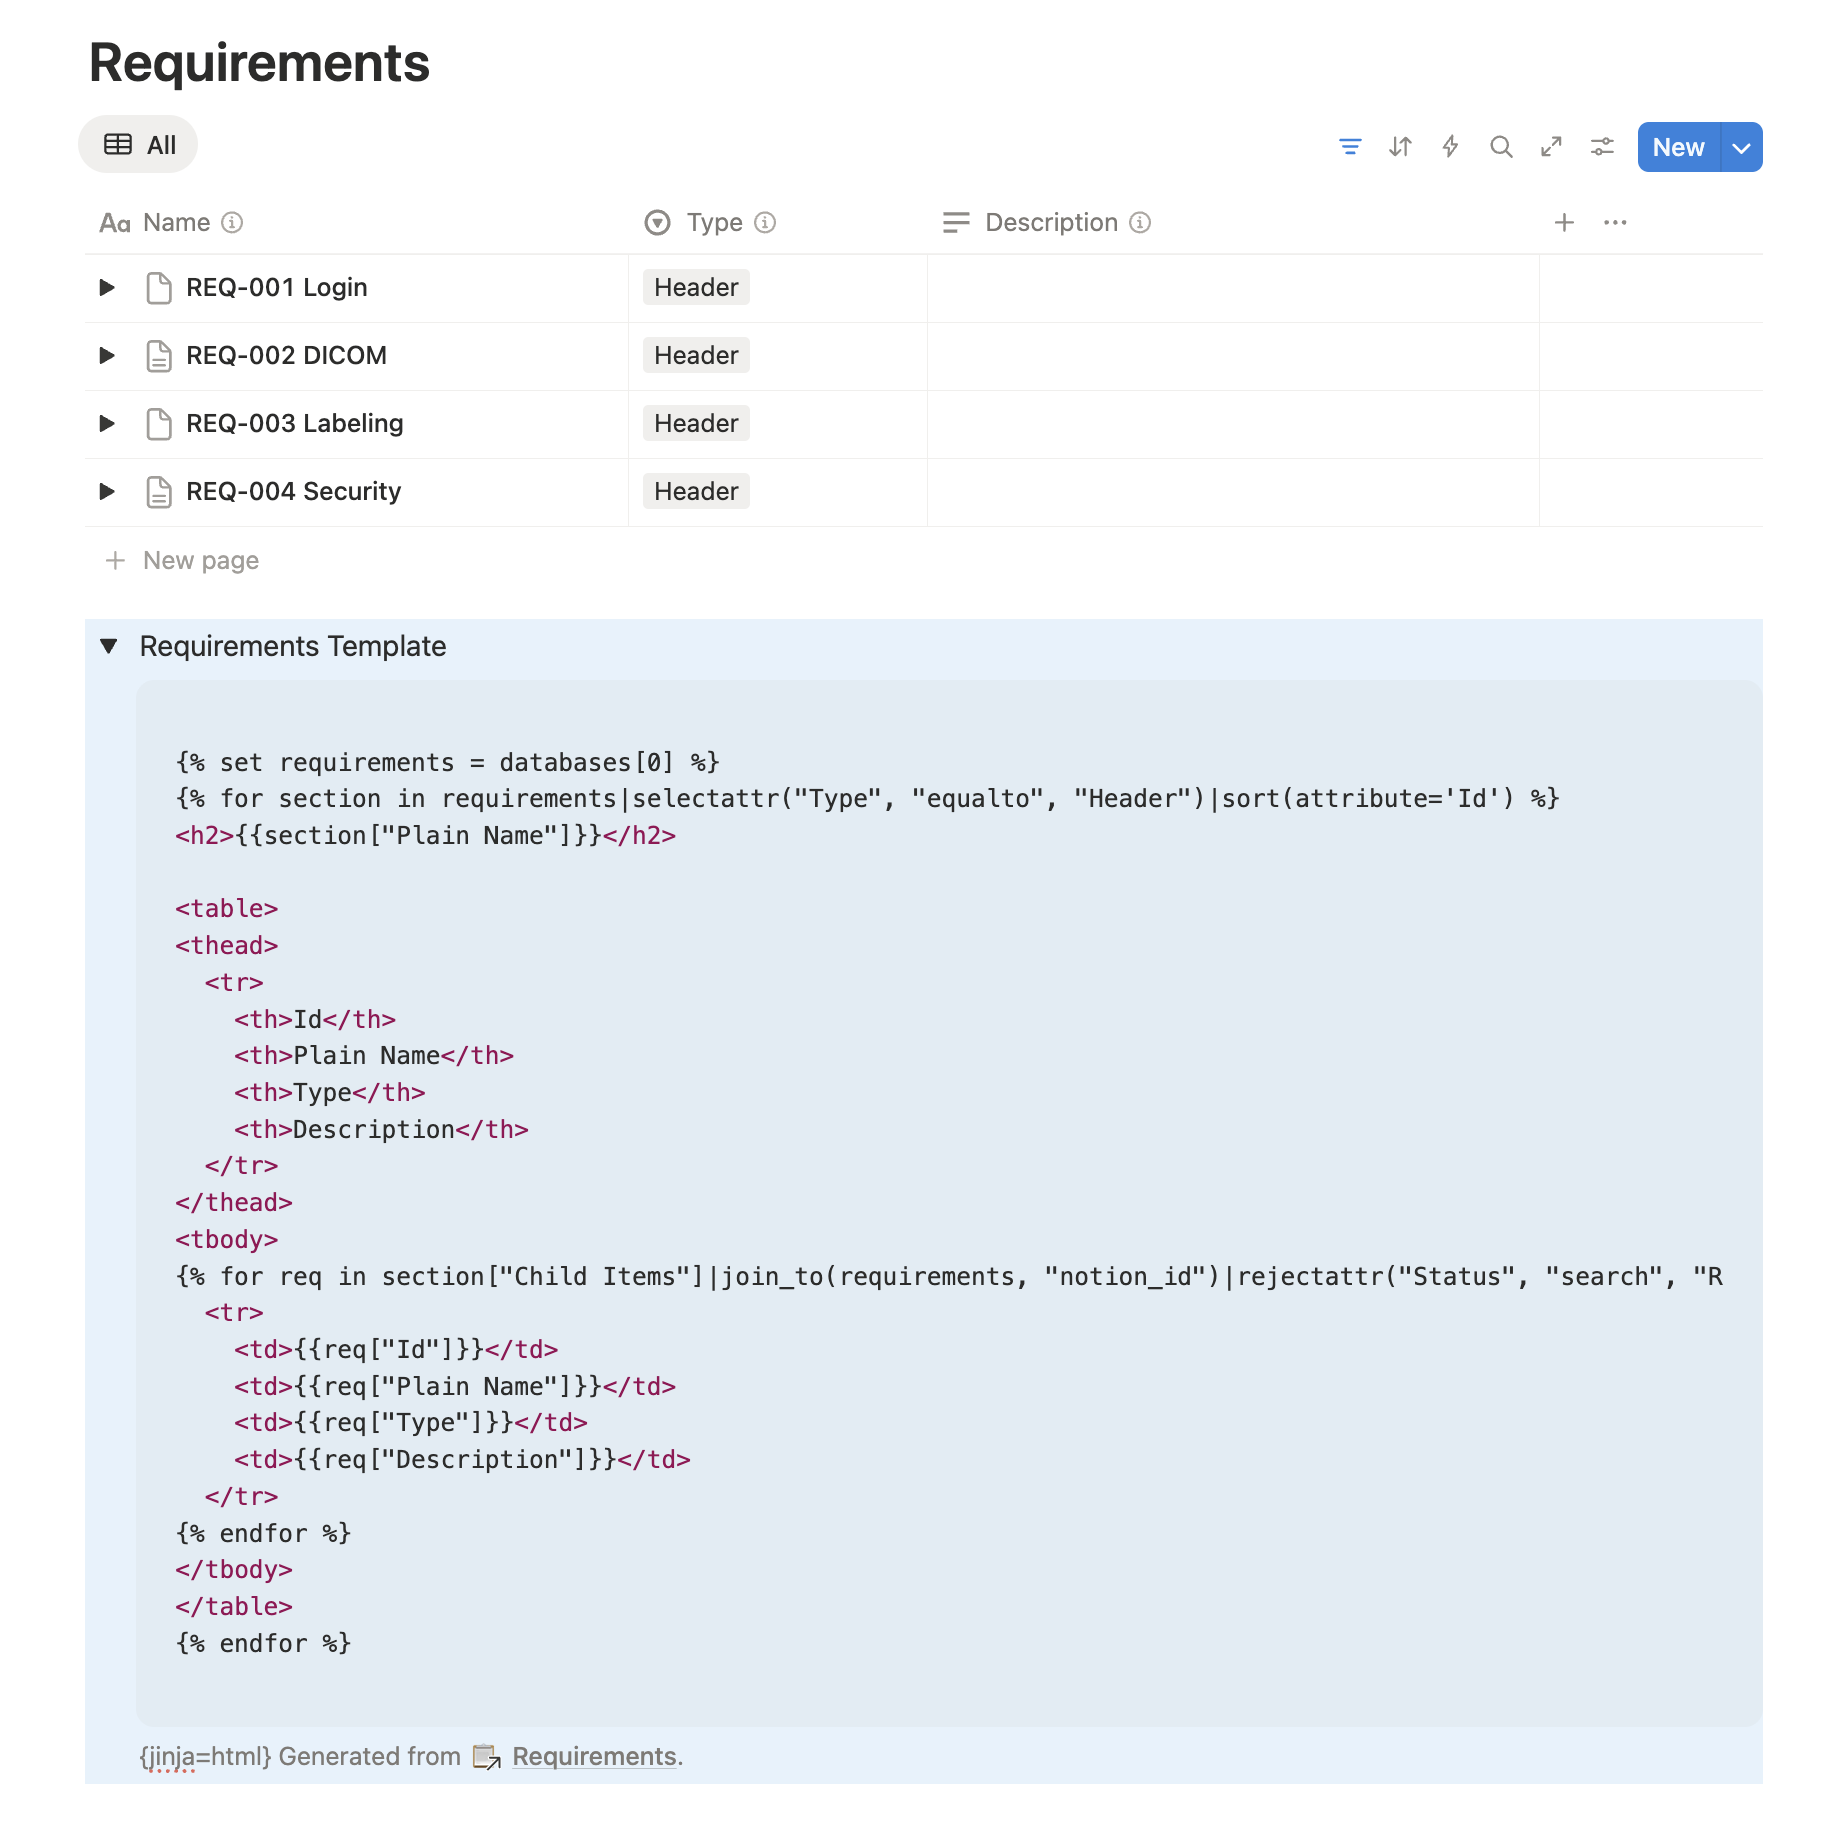
In practice, these elements typically appear together in a document page: a linked database view at the top (so authors can see and edit the data in context), followed by a blue toggle block containing a jinja block inside it. The linked database view is always stripped from the export—it is only there for the author’s convenience. The blue toggle block is also stripped, but the jinja block inside it is rendered into the final document.
Keep filters in sync. If you change the filtering or sorting on a linked database view, those changes are not automatically reflected in the jinja block. Make sure the filters in your jinja template match the view’s filters so the exported content stays consistent with what you see in Notion.
A jinja block is always a Notion code block whose caption begins with {jinja=html} (or another output format, though html is typical). The code block’s content is a template written in the MiniJinja template language. To pull data from a database, add a database mention to the caption after the format tag. Each mentioned database is available as an entry in a databases array, in caption order.
For readability, we recommend renaming the array entries using set at the top of your template. The join_to filter resolves relation properties across databases by matching IDs against a target database’s notion_id field. You can filter rows using MiniJinja’s built-in filters, and Medtech OS also provides a search test for regex matching.
Templates also have access to a page object containing the current document page’s properties (e.g., page["Approver(s)"]). This lets you reference the page’s own relation properties, such as joining approvers against a team directory database.
You can also inline a page’s body content using render_content: {{ row.notion_id|render_content(1) }}. The argument is optional. Use 0 (or omit it) to keep heading levels unchanged, 1 to reduce each heading level by one, and so on (minimum heading level is always clamped to H1).
Example: A linked database view at the top shows the Requirements data for the author’s reference—this is stripped from the export. Below it, a blue toggle block labeled “Requirements Template” contains the jinja code block. The toggle is also stripped, but the jinja block inside it is rendered into the final document. Notice the caption at the bottom: {jinja=html} followed by a database mention.
AI-assisted error correction. If a jinja block contains a syntax error or produces unexpected output, Medtech OS will use AI to suggest corrections and help you fix it.
Customization
Property Table
When the Export Properties checkbox is checked on an Export Config row, exported documents include a two-column property table at the top showing each Notion property and its value. File properties appear as plain text with an “(attachment)” label; the actual files are embedded as attachments in the PDF.
The following properties are excluded from the table:
- Button properties (not meaningful in an export)
- Properties whose name starts with _ (underscore) — use this naming convention to hide internal or administrative properties from exports
- The Medtech OS, Approvers, and Revisions infrastructure properties
DOCX Template
The DOCX template uploaded to your Export Config controls the visual appearance of exported documents—fonts, colors, margins, page layout, and header/footer content. Medtech OS uses this template as a reference when generating documents, so any styling changes you make will be reflected in every export.
Read more about how to customize the template below. See Update Configuration for how to validate your template.
Required Paragraph Styles
Your template must define the following paragraph styles: Heading1, Heading2, Heading3, Heading4, Heading5, Heading6, BodyText, BlockText, SourceCode, ImageCaption, Compact, FirstParagraph, and Hyperlink. These styles control how Notion content maps to the final document.
Start from the sample template. The easiest way to get started is to use the provided sample template and modify it to match your branding.
Notion Color Styles
If your Notion pages use colored text or background highlights, the template can preserve those colors in the exported DOCX. The template must define character styles named NotionRed, NotionBlue, NotionGreen, NotionYellow, NotionOrange, NotionPurple, NotionPink, NotionBrown, NotionGray (for text colors), and NotionRedBg, NotionBlueBg, etc. (for background colors). If these styles are missing, colored text will render with the default style instead. Update Configuration will warn you if any of these styles are absent.
The sample template includes color styles. If you started from the provided sample template, all 18 Notion color styles are already defined. You only need to add them manually if you built your template from scratch.
What You Can Change
- Font families, sizes, colors, and emphasis (bold, italic)
- Page margins, orientation, and paper size
- Header and footer content and layout
- Table, list, and paragraph formatting
- Any other Word style property
What You Cannot Change
- The required paragraph style names listed above—they must exist with exactly those names
Template Variables
You can place template variables in headers and footers to insert dynamic values from each document’s Notion properties. Variables use the format tempVARIABLE, where VARIABLE is the property name converted to uppercase with spaces replaced by underscores.
The following variables are always available:
| Variable | Source |
|---|---|
| tempDATE | Today’s date in MM/DD/YYYY format. Always set automatically. |
| tempNAME | The document title with the document ID prefix stripped. See Document IDs. |
| tempID | The document ID prefix extracted from the title (e.g. “DOC-004”). Empty if the title does not match the expected pattern. See Document IDs. |
| tempREVISION | The revision name (e.g. “A”, “B”, or “1”, “2”). |
Any other Notion property on the document page is also available as a template variable. For example, a property named “Department” becomes tempDEPARTMENT, and “Effective Date” becomes tempEFFECTIVE_DATE.
Template variables are substituted only in headers and footers, not in the document body. If Word splits a variable across multiple text runs, Medtech OS will still find and replace it correctly.
Known Issues
Columns are flattened
Notion column layouts are not preserved as side-by-side columns in the export. The content from each column is rendered sequentially—first column, then second column, and so on—as if the blocks were stacked vertically.
Combined text color and background color
Due to a limitation with the Notion API, when both a text color and a background color are set on the same text, the background color will be lost in the export. This is a known Notion API limitation.